September 23, 2026 · Bella Virtual Staging
How to Stage a Living Room to Sell (Physically and Virtually)
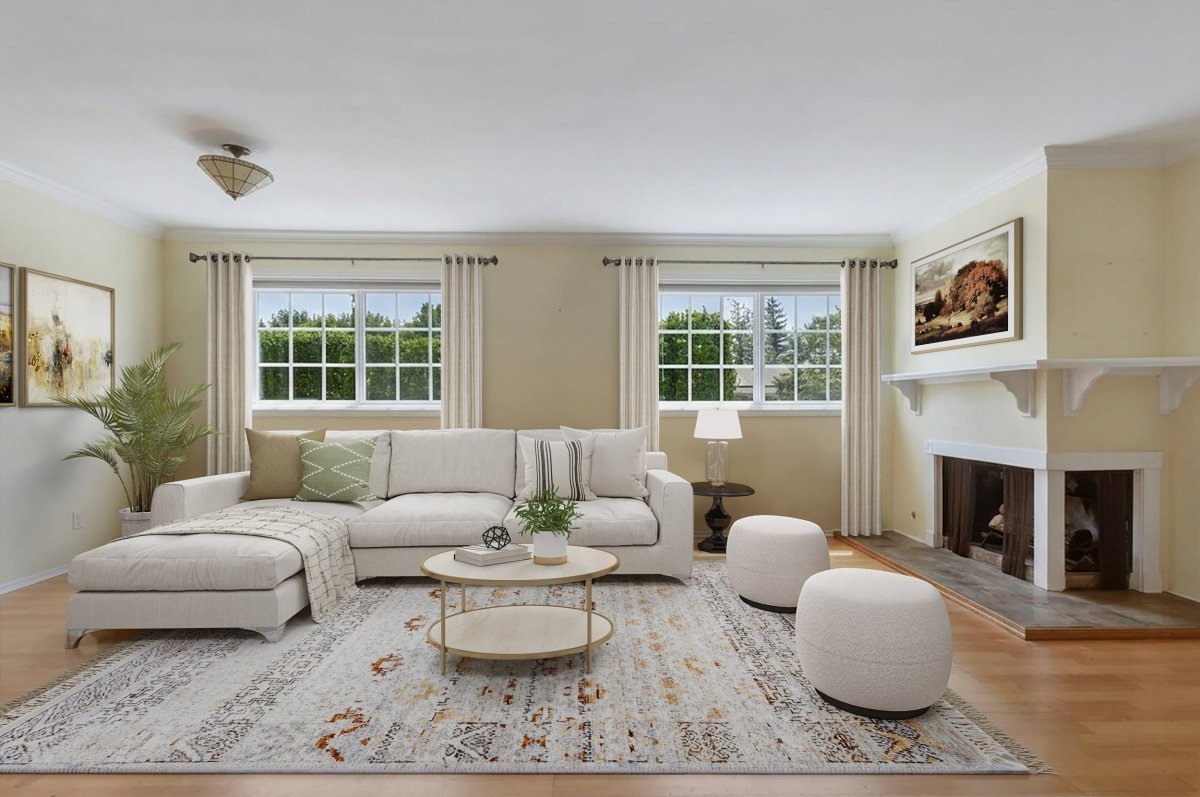
To stage a living room, declutter and deep clean first, then float your seating into a conversation group anchored by a rug, layer lighting from at least three sources, and add a few large, neutral decor pieces so buyers see space and comfort rather than your personal life. If the room is empty or the furniture is dated, virtual staging can furnish the listing photos digitally for far less money than renting physical furniture.
At Bella Virtual Staging, real interior designers furnish living room photos digitally, never with AI, so every image is proportionate, realistic and ready for the MLS.
Why does the living room matter most when you stage?
The living room is usually the first big photo buyers see online, and it is the room stagers prioritize over every other space in the house.
According to the NAR 2025 Profile of Home Staging, the living room is the most commonly staged room: 91% of sellers' agents who staged a home included it. NAR research also finds that 82% of buyers' agents say staging helps buyers visualize the property as a future home, and 97% of buyers use the internet in their search. For most people, the living room photo decides whether they keep clicking.
Because the living room is where people relax, spend family time and do most of their socializing, it also signals how spacious and comfortable the rest of the house feels. A well-staged living room tells buyers they can sit down, entertain and make the place their own, without too much personality getting in the way.
How do you stage a living room step by step?
Staging a living room for sale follows a clear sequence you can often complete over a weekend, whether you are selling a starter condo or a larger family home.
- Declutter and depersonalize. Pack away family photos, collections and other small items. Clear the shelf, the mantel and every flat surface down to a few pieces so the room looks larger. Store the extras off-site or in a closet.
- Deep clean. Clean carpets and upholstery, wipe baseboards, dust light fixtures and wash windows inside and out. A spotless room reads as a well-maintained home.
- Fix and freshen. Touch up scuffed walls in a neutral paint color, replace burned-out bulbs and fix loose hardware or trim.
- Plan the layout. Arrange the sofa and chairs to face a focal point, such as a fireplace, picture window or media wall, while keeping walkways clear.
- Layer lighting. Use at least three light sources: a ceiling fixture, a floor lamp and a table lamp on a side table.
- Add a rug and soft furnishings. Choose an area rug large enough for the front legs of the sofa and chairs, then add textured pillows for visual interest and a throw blanket for warmth.
- Style one focal point. Pick a single center of attention, such as the mantel, a large artwork or a built-in, and style it with a few accent pieces grouped in threes. Keep everything else simple so the eye knows where to focus.
How should you arrange living room furniture for staging?
Pull furniture off the walls into a conversation group facing the focal point, and keep walkways clear so buyers can walk through without weaving around obstacles.
- Leave a clear path from the door through the room.
- Sofa-to-coffee-table distance: about 14 to 18 inches, close enough to reach a drink on the tray and wide enough to walk past.
- Front legs on the rug. This anchors the seating group and makes the layout look intentional.
- Balance visual weight. If a large sofa dominates one side, balance it with an accent chair, a floor lamp and a plant on the other. In a small room, ottomans that double as tables add flexibility.
- Remove extra pieces. An extra recliner or an oversized entertainment unit can go to storage. Fewer pieces make the room look more spacious.
- Test with painter's tape. Tape furniture footprints on the floor before moving heavy pieces.
Working with existing furniture: not everything has to go. Keep what is clean and proportionate, remove or relocate anything bulky or worn, and use neutral slipcovers or a new throw to refresh tired upholstery. A combination of editing and small updates often works better than starting over.
How do you use natural light to make a living room look brighter and bigger?
Natural light and scale do more for a living room than expensive decor. Bright rooms look larger, cleaner and more inviting in photos and in person, and they give the space a lift of energy.
- Open blinds and curtains fully before every showing and photo, and turn every light on.
- Warm-white bulbs (2700K to 3000K) in every fixture, with at least three light sources so there are no dark corners.
- Light, neutral walls such as warm white, soft beige or light greige appeal to the widest range of buyers.
- Hang curtains high and wide. Mount the rod close to the ceiling and extend it past the window frame so the window, and the room, look taller and wider. Opt for sheer curtains or light drapes that let daylight in.
- Size the rug correctly. A rug that is too small makes the seating look like a floating island. In an open plan, use rugs to separate the living and dining zones.
- Fewer, larger art pieces. One oversized print or mirror will draw the eye better in photos than a cluster of small pictures.
What decor should you add or remove?
Less, larger and neutral-leaning decor beats a busy mix every time. Pack away family photos, religious or political displays, niche collections, cords, clutter and small floor items such as pet bowls and toys.
Coffee table: a tray, a small plant or vase of flowers, and one or two books. Keep most of the table clear.
Mantel: center one mirror or artwork, then add two or three objects of different heights, such as a vase, a plant and unlit candles.
Media wall: hide cords, reduce the number of visible devices and keep decor minimal so the TV does not dominate the photos.
Color and texture: try the 60-30-10 rule, with about 60% a main neutral, 30% a supporting neutral and 10% a soft accent color. Add texture with woven baskets, knit throws, linen pillows and a few live plants instead of bold patterns.
How do you stage a living room virtually?
Photograph the empty or decluttered room well, send the photos to a virtual staging service, and a designer furnishes the space digitally so the listing looks move-in ready online.
Photo tips for the best results:
- Shoot from a corner or the entrance at about chest height to capture the widest view of the room.
- Keep vertical lines straight.
- Turn all lights on and open every blind and curtain for maximum natural light.
Bella Virtual Staging specifics:
- Virtual staging costs $37 USD per photo. Furniture removal is included for occupied rooms, delivery takes 24 to 48 hours, and revisions are unlimited for two weeks.
- Volume discounts: 5% off at 3+ photos, 10% at 6+, 15% at 11+ and 20% at 21+.
- Virtual renovation (new floors, wall paint or fireplace finishes, plus staging) is $69 per photo, for rooms that need more than furniture.
To see the difference staging makes, look at our empty living room to warm modern example.
Disclosure matters. Always label virtually staged photos. NAR Code of Ethics Article 12 requires REALTORS® to "present a true picture in their advertising, marketing, and other representations." California's AB 723, effective January 1, 2026, requires a conspicuous disclosure that an image was digitally altered, plus a link or QR code to the unaltered original. MLS rules vary by board, so check your local guidelines before uploading.
How much does it cost to stage a living room?
There are three main paths, and the right one depends on your budget, timeline and how many rooms need help before the sale.
- DIY staging: the cost of cleaning supplies, paint and a few pillows, throws and plants. Low cost, but time-intensive.
- Professional physical staging: a consultation typically runs $150 to $600, and furniture rental about $500 to $600 per room, per month (Bankrate, citing HomeAdvisor). These are typical estimates that vary by market. NAR's 2025 staging profile puts the median spend at $1,500 when agents used a staging service.
- Bella Virtual Staging: $37 per photo with furniture removal included and 24 to 48 hour delivery, or $69 per photo for virtual renovation.
For a whole-home breakdown, see how much home staging costs.
Frequently asked questions
What is the first thing to do when staging a living room?
Declutter and deep clean before spending anything on decor or furniture. Pack away personal items and clear flat surfaces except for a few styled pieces. This alone makes a living room feel larger and brighter.
How do you stage a small living room?
Scale is everything. Choose a smaller sofa or loveseat, one accent chair and a slim coffee table instead of bulky recliners or oversized sectionals. Use light colors, wall-mounted shelves instead of heavy bookcases, and a rug that defines the seating zone. Our guide to furniture placement in narrow rooms has more layout tips.
Do you use AI to virtually stage living rooms?
No. Every Bella Virtual Staging image is created by human interior designers and 3D artists. AI tools can produce floating furniture, wrong scale, objects blocking a door or window, and changes to walls or room dimensions that can mislead buyers. A hand-made approach gives precise control over proportions and lighting.
Where can I find more living room staging ideas?
Browse our top living room staging ideas for furniture, color and style inspiration.